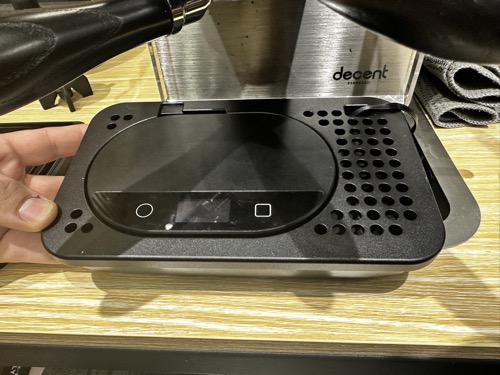
### Powering on and off
To turn the scale on:
Hold down the O button
To turn the scale on, with bluetooth disabled:
Hold down the ▢ button
To turn the scale on, in SETUP mode:
Hold down both the O and ▢ buttons
In setup mode, you can upgrade your firmware via wifi , weight calibrate your scale, and see what firmware and PCB version you have.
To see the PCB and Firmware version, while in SETUP mode:
tap the O button to choose "About"
then tap the ▢ button to select "About"
then tap the ▢ button to leave the "About" section
Note: you will need to know your PCB version if you want to upgrade your firmware.
To turn the scale off:
double-tap the O button
If the scale is currently connected to an app, there is an additional safety to prevent accidentally turning the scale off.
A message will appear on the scale indicating you need to quickly tap the ▢ button to force a power off.
Usually, it is better to exit the app first, and then turn the scale off.
Weighing and Timing
To TARE (reset weight to zero)
quickly tap the O button
Note: the O button is by disabled by default, when you are connected to an app. This is so the app can decide what functionality the O button has (if any).
To use the timer:
When the timer is off, tap the ▢ button once to turn the timer on and start counting seconds.
When the timer is running, tap the ▢ button once to stop the timer at the current time.
When the timer has been stopped, tap the ▢ button once to turn the timer off.
Note: the ▢ button is by disabled by default, when you are connected to an app. This is so the app can decide what functionality the ▢ button has (if any).
To weigh while plugged into USBC:
We provide you with a USBC cable that minimally affects the weight accuracy of the scale
If you use your own cable make sure you use a very flexible cable. Avoid solid-core cables; a woven cable is recommended
Make sure there is no tension between the cable and the scale, or weight accuracy will be affected.
If you're using a replacement drip tray that holds the scale countersunk, here is what that looks like.
Make sure that excessive water does not splash on the USB cable, as that can cause the power to short out. The USBC cable connector can also rust internally. If this happens, you can replace the USBC cable.
Meaning of the icons
The Bluetooth graphic
If the B graphic is blinking, then the scale is ready to accept a bluetooth connection from an app
If the B graphic has a line struck through it, then Bluetooth is disabled (you probably powered up with the ▢ button)
If the B graphic is on but not blinking, then the scale is connected via bluetooth to an app
Note that on iOS, even if you exit your app, the Bluetooth connection might still be maintained.
This is a feature of iOS.
If you want to switch between scale-using apps on iOS, and you experience bluetooth connection difficulties, you might want to turn the scale off and back on before launching the new app.
The battery icon
On the bottom right, the amount of charge in the battery is displayed
If you plug the scale into USB, the icon will have a small lightning bolt in it.
When plugged into USB power, the battery is not used at all in the functioning of the scale, which greatly preserves the lifetime of the battery.
When the scale is powered off, and you plug USB in, you will see a large battery icon, indicating the voltage available from the battery, as well as the battery charge percentage.
The battery icon bars indicate:
No bars: 0%–5%(3.400V–3.435V)
1 bar of charge:6%–25%(3.435V–3.575V)
2 bars:26%–50%(3.575V–3.750V)
3 bars:51%–75%(3.750V–3.925V)
4 bars(full):76%–100%(3.925V–4.100V)
Sleep mode
If you are connected to an app, the app might sometimes put the scale to sleep. The display turns off but the app is still bluetooth connected to the scale.
The app can also quickly bring the scale out of sleep, with the bluetooth connection maintained
In sleep mode, the scale uses dramatically less battery power
However, the battery is still being used in sleep mode, and your scale will eventually run out of power
Generally, in sleep mode, the scale can last one week without being recharged
If your scale is in a permanent location (ie, you are not moving it around) we recommend you leave the scale permanently connected to USB power.
Other Hardware Topics
Rubber feet
The rubber feet on the bottom of the scale are 1mm thick. This is fine for most uses.
If you want to mount your scale into another chassis (for example, into a replacement drip tray) the position of the rubber feet can be used to lock the scale in correctly. In this case, you might want to peel off the 1mm feet and install 2mm rubber feet instead.
Reset button
Usually, you will only need to use this button if you have upgraded the scale's firmware via USBC.
On the bottom of the scale, there is a hole in the chassis with a push button behind it.
Using a screwdriver, you can push this button
This button "reboots" your scale. No data is lost.
For more information:
Half Decent Scale Manual: table of contents
#decentscale #feet #reset #sleep #bluetooth #battery #setup #usbc #charging #weighing #tare #calibrate