How to replace the DE1 Uptake Group
![]()
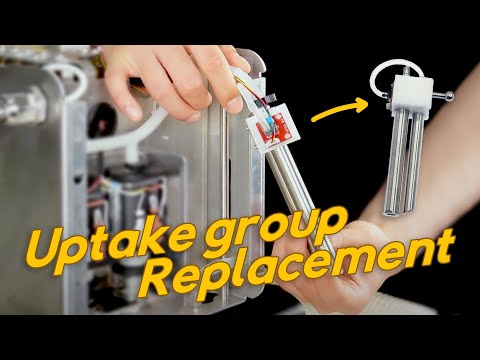
In this video, we'll walk you through how to replace the Uptake group.
The Uptake group includes
- Uptake pipe
- Water level pipe
- Water level sensor
When the metal pipes have scale stuck on them and cause discoloration, you may want to replace the Uptake Group.
Important: Do not open the board room or attempt to access the AC board without our guidance. The AC board carries high voltage.
This video is part of a series that we produce, helping people self-repair their Decent Espresso Machine.
- Only do this repair in consultation with Decent tech support
- Doing otherwise might break your machine or void your warranty.
Uptake Group Replacement Instructions
Tools Needed
● T10 Torx screwdriver
● PH2 Phillips screwdriver
● T20 Torx Screwdriver
● Angled pointy tweezers
● Pliers
Step 1: Power Disconnection
For XL or XXL Models:
- Remove the back panel.
- Turn off the machine's back switch.
- Unplug the power cord.
For Pro and Plus Models:
- Turn off the machine's back switch.
- Unplug the power cord.
For Version 1.43 or Higher (Slide-Type Tablet Stand):
- Unplug the USB cable.
- Gently pull the tablet stand out.
For Version 1.3 to 1.42 (Screw-Type Tablet Stand):
- Unscrew the three screws holding the tablet stand.
- Remove the stand.
Step 2: Remove External Components
- Remove the drip tray.
- Remove the drip tray cover.
- Lift the lever on the back of the machine.
- Slide the water tank out and remove it.
- Remove the portafilter.
- Remove the group head handle.
Step 3: Remove the Main Cover and Boardroom lid
- Use a T10 screwdriver to remove the 8 screws securing the main cover.
- Gently stretch the sides of the cover outward.
- Lift the cover off the machine.
Step 4: Remove the Chassis
- Identify the screw type for the manifold (T10 Torx or PH2 Phillips).
- Remove the 6 screws securing the chassis.
- Remove the side screw of the boardroom lid (T10 or PH2). Remove the lid.
Step 5: Remove the Old Uptake Group
- Use a T20 or PH2 screwdriver to remove the screw on top of the guide rod bracket. (Save the washer)
- Unscrew the two screws on the back of the machine holding the bracket with a T10 or PH2 screwdriver.
- Remove the bracket.
- Lift the uptake group out of the guide rod.
- Pull out the water level sensor cable from its board.
- Pull the water level sensor tube from both the plastic and metal barb connectors.
- Remove the hose clamp.
- Hold one ear with pliers
- Twist to release it
- Stretch to remove it
- Pull out the F-type tube that connects the intake pipe to the pumps.
Step 6: Install the New Uptake Group
- Pull the thin tube from the water level sensor.
- Connect the F-type tube from the pumps to the intake pipe.
- Reconnect the water level sensor tube to its board.
- Plug the water level sensor cable into the connector on the board.
- Hold the tube end with the hose clamp.
● Stretch it open.
● Surround the tube end.
● Rotate it.
● Tighten it with your finger, then pliers
- Pass the guide rod through the hole in the new uptake group.
- Install the guide rod bracket.
● Put the center screw back in (Washer between the screw and bracket).
● Install the two screws on the back.
Step 7: Reassemble the Machine
- Reattach the boardroom lid (1 screw).
- Reinstall the back panel:
● Insert refill water inlet barb connector.
● Hold panel while tightening the intake lever.
● Pro: Tighten 4 T10 screws.
● XL/XXL: Reinstall 4 standoffs (finger‑tight, then secure).
- Reattach the side panel:
● Tighten first 5 screws halfway.
● Then fully tighten all.
***
#howto #uptake #waterlevel #repair #DIY #documentation
Updated 2025/09/22